wait/notify机制 不使用wait/notify机制实现线程间通信 之前说过volatile可以实现不同线程的变量的可见性。所以不同线程间通信可以使用volatile变量来进行信息交换。
示例:
自定义List类:
1
2
3
4
5
6
7
8
9
10
11
12
package mylist;import java.util.ArrayList;import java.util.List;public class MyList { volatile private List list = new ArrayList (); public void add () { list.add("tom" ); } public int size () { return list.size(); } }
线程类A:
1
2
3
4
5
6
7
8
9
10
11
12
13
14
15
16
17
18
19
20
21
package extthread;import mylist.MyList;public class ThreadA extends Thread { private MyList list; public ThreadA (MyList list) { super (); this .list = list; } @Override public void run () { try { for (int i = 0 ; i < 10 ; i++) { list.add(); System.out.println("添加了" + (i + 1 ) + "个元素" ); Thread.sleep(1000 ); } } catch (InterruptedException e) { e.printStackTrace(); } } }
线程类B:
1
2
3
4
5
6
7
8
9
10
11
12
13
14
15
16
17
18
19
20
21
22
package extthread;import mylist.MyList;public class ThreadB extends Thread { private MyList list; public ThreadB (MyList list) { super (); this .list = list; } @Override public void run () { try { while (true ) { if (list.size() == 5 ) { System.out.println("==5了,线程b要退出了!" ); throw new InterruptedException (); } } } catch (InterruptedException e) { e.printStackTrace(); } } }
运行类:
1
2
3
4
5
6
7
8
9
10
11
12
13
14
15
package test;import mylist.MyList;import extthread.ThreadA;import extthread.ThreadB;public class Test { public static void main (String[] args) { MyList service = new MyList (); ThreadA a = new ThreadA (service); a.setName("A" ); a.start(); ThreadB b = new ThreadB (service); b.setName("B" ); b.start(); } }
结果:
1
2
3
4
5
6
7
8
9
10
11
12
添加了1个元素 添加了2个元素 添加了3个元素 添加了4个元素 ==5了,线程b要退出了! 添加了5个元素 java . lang.InterruptedException at extthread. ThreadB . run (ThreadB.java:20) 添加了6个元素 添加了7个元素 添加了8个元素 添加了9个元素
wait()方法 wait()方法是Object类的方法,它的作用是使当前执行wait()方法的线程等待,在wait()所在的代码行处暂停执行,并释放锁,直到接到通知或被中断为止 。
在调用wait()之前,线程必须获得该对象的对象级别锁,即只能在同步方法或同步块中调用wait()方法 。
通过通知机制使某个线程继续执行wait()方法后面的代码时,对线程的选择是按照执行wait()方法的顺序确定的,并需要重新获得锁。
如果调用wait()时没有持有适当的锁,则抛出IllegalMonitorStateException,它是RuntimeException的一个子类,因此不需要try-catch语句捕捉异常。
wait(long)方法 wait(long)方法想要自动向下运行也要持有锁,如果没有锁,则一直在等待,直到持有锁为止。
notify()方法 notify()方法要在同步方法或同步块中调用 ,即在调用前,线程必须获得锁,如果调用notify()时没有持有适当的锁,则会抛出IllegalMonitorStateException。
该方法用来通知那些可能等待该锁的其他线程,如果有多个线程等待,则按照执行wait()方法的顺序对处于wait状态的线程发出一次通知(notify),并使该线程重新获取锁。
需要说明的是,执行notify()方法后,当前线程不会马上释放该锁,呈wait状态的线程也并不能马上获取该对象锁,要等到执行notify()方法的线程将程序执行完,也就是退出synchronized同步区域后,当前线程才会释放锁,而呈wait状态的线程才可以获取该对象锁。
当第一个获得了该对象锁的wait线程运行完毕后,它会释放该对象锁,此时如果没有再次使用notify语句,那么其他呈wait状态的线程因为没有得到通知,会继续处于wait状态。
总结:wait()方法使线程暂停运行,而notify()方法通知暂停的线程继续运行。
notifyAll()方法 notifyAll()方法会按照执行wait()方法的倒序依次对其他全部线程进行唤醒。
wait/notify机制 拥有相同锁的线程才可以实现wait/notify机制,所以调用这两个方法必须持有对应对象的锁,即必须在同步代码块中。
示例:
wait类
1
2
3
4
5
6
7
8
9
10
11
12
13
14
15
16
17
18
19
20
21
22
23
24
25
26
package extthread;public class MyThread1 extends Thread { private Object lock; public MyThread1 (Object lock) { super (); this .lock = lock; } @Override public void run () { try { synchronized (lock) { System.out.println("开始 wait time=" + System.currentTimeMillis()); lock.wait(); System.out.println("结束 wait time=" + System.currentTimeMillis()); } } catch (InterruptedException e) { e.printStackTrace(); } } }
notify类:
1
2
3
4
5
6
7
8
9
10
11
12
13
14
15
16
17
18
19
package extthread;public class MyThread2 extends Thread { private Object lock; public MyThread2 (Object lock) { super (); this .lock = lock; } @Override public void run () { synchronized (lock) { System.out.println("开始notify time=" + System.currentTimeMillis()); lock.notify(); System.out.println("结束notify time=" + System.currentTimeMillis()); } } }
运行类:
1
2
3
4
5
6
7
8
9
10
11
12
13
14
15
16
17
18
19
20
21
22
23
package test;import extthread.MyThread1;import extthread.MyThread2;public class Test { public static void main (String[] args) { try { Object lock = new Object (); MyThread1 t1 = new MyThread1 (lock); t1.start(); Thread.sleep(3000 ); MyThread2 t2 = new MyThread2 (lock); t2.start(); } catch (InterruptedException e) { e.printStackTrace(); } } }
结果:
1
2
3
4
开始 wait time=1405413930814 开始notify time=1405413933816 结束notify time=1405413933816 结束wait time=1405413933816
线程状态切换
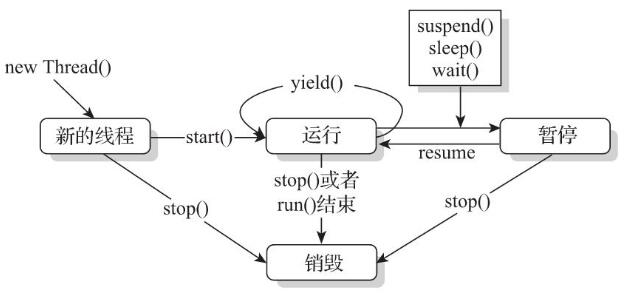
1)创建一个新的线程对象后,调用它的start()方法,系统会为此线程分配CPU资源,此时线程处于runnable(可运行)状态,这是一个准备运行的阶段。如果线程抢占到CPU资源,则此线程就处于running(运行)状态。
2)runnable状态和running状态可相互切换,因为有可能线程运行一段时间后,其他高优先级的线程抢占了CPU资源,这时此线程就从running状态变成runnable状态。
线程进入runnable状态大体分为如下4种情况。
3)blocked是阻塞的意思,例如,如果遇到了一个I/O操作,此时当前线程由runnable运行状态转成blocked阻塞状态,等待I/O操作的结果。这时操作系统会把宝贵的CPU时间片分配给其他线程,当I/O操作结束后,线程由blocked状态结束,进入runnable状态,线程会继续运行后面的任务。
出现阻塞的情况大体分为如下5种。
线程调用sleep()方法,主动放弃占用的处理器资源。
线程调用了阻塞式I/O方法,在该方法返回前,该线程被阻塞。
线程试图获得一个同步监视器,但该同步监视器正被其他线程所持有。
线程等待某个通知(notify)。
程序调用了suspend()方法将该线程挂起。此方法容易导致死锁,应尽量避免使用该方法。
4)run()方法运行结束后进入销毁阶段,整个线程执行完毕。
sleep()方法 sleep与wait的不同在于,wait会释放对应的锁。而sleep并不会释放锁。
interrupt()方法与wait()方法 注意:当线程调用wait()方法后,再对该线程对象执行interrupt()方法会出现Interrupted-Exception异常。
所以有以下几点:
执行完notify()方法后,按照执行wait()方法的顺序唤醒其他线程。notify()所在的同步代码块执行完才会释放对象的锁,其他线程继续执行wait()之后的代码。
在执行同步代码块的过程中,遇到异常而导致线程终止,锁也会被释放。
在执行同步代码块的过程中,执行了锁所属对象的wait()方法,这个线程会释放对象锁,等待被唤醒。
通过管道实现线程间通信 Java语言提供了各种各样的输入/输出流,使我们能够很方便地对数据进行操作,其中管道流(pipe stream)是一种特殊的流,用于在不同线程间直接传送数据。一个线程发送数据到输出管道,另一个线程从输入管道中读数据。通过使用管道,实现不同线程间的通信,而无须借助于类似临时文件之类的东西。
Java JDK提供了4个类来使线程间可以进行通信,即PipedInputStream和PipedOutputStream、PipedReader和PipedWriter。
通过管道进行线程间通信——字节流 下面通过字节流,即PipedInputStream和PipedOutputStream来进行通信。
例如:
写数据:
1
2
3
4
5
6
7
8
9
10
11
12
13
14
15
16
17
18
19
20
21
22
package service;import java.io.IOException;import java.io.PipedOutputStream;public class WriteData { public void writeMethod (PipedOutputStream out) { try { System.out.println("write :" ); for (int i = 0 ; i < 300 ; i++) { String outData = "" + (i + 1 ); out.write(outData.getBytes()); System.out.print(outData); } System.out.println(); out.close(); } catch (IOException e) { e.printStackTrace(); } } }
读数据:
1
2
3
4
5
6
7
8
9
10
11
12
13
14
15
16
17
18
19
20
21
22
23
24
package service;import java.io.IOException;import java.io.PipedInputStream;public class ReadData { public void readMethod (PipedInputStream input) { try { System.out.println("read :" ); byte [] byteArray = new byte [20 ]; int readLength = input.read(byteArray); while (readLength != -1 ) { String newData = new String (byteArray, 0 , readLength); System.out.print(newData); readLength = input.read(byteArray); } System.out.println(); input.close(); } catch (IOException e) { e.printStackTrace(); } } }
在定义两个线程运行这两个程序,
执行类:
1
2
3
4
5
6
7
8
9
10
11
12
13
14
15
16
17
18
19
20
21
22
23
24
25
26
27
28
29
30
31
32
33
34
35
36
37
38
39
40
41
42
43
44
45
46
47
48
49
50
51
52
53
54
55
56
57
58
59
60
61
62
63
64
65
66
67
68
69
70
71
72
73
74
75
76
77
78
79
80
81
82
83
84
package test;import java.io.IOException;import java.io.PipedInputStream;import java.io.PipedOutputStream;import service.ReadData;import service.WriteData;import extthread.ThreadRead;import extthread.ThreadWrite;public class Run { public static void main (String[] args) { try { WriteData writeData = new WriteData (); ReadData readData = new ReadData (); PipedInputStream inputStream = new PipedInputStream (); PipedOutputStream outputStream = new PipedOutputStream (); outputStream.connect(inputStream); ThreadRead threadRead = new ThreadRead (readData, inputStream); } System.out.println(); input.close(); } catch (IOException e) { e.printStackTrace(); } } } 两个自定义线程类代码如图3 -35 所示。 图3 -35 两个自定义线程类代码 类Run.java代码如下: package test;import java.io.IOException;import java.io.PipedInputStream;import java.io.PipedOutputStream;import service.ReadData;import service.WriteData;import extthread.ThreadRead;import extthread.ThreadWrite;public class Run { public static void main (String[] args) { try { WriteData writeData = new WriteData (); ReadData readData = new ReadData (); PipedInputStream inputStream = new PipedInputStream (); PipedOutputStream outputStream = new PipedOutputStream (); outputStream.connect(inputStream); ThreadRead threadRead = new ThreadRead (readData, inputStream); threadRead.start(); Thread.sleep(2000 ); ThreadWrite threadWrite = new ThreadWrite (writeData, outputStream); threadWrite.start(); } catch (IOException e) { e.printStackTrace(); } catch (InterruptedException e) { e.printStackTrace(); } } }
代码inputStream.connect(outputStream)或outputStream.connect(inputStream)的作用是使两个管道之间建立通信连接,这样才可以对数据进行输出与输入。
通过管道进行线程间通信——字符流 同样的,可以使用PipedReader和PipedWriter。来实现线程间通信。
join()方法 在很多情况下,主线程创建并启动子线程,如果子线程要进行大量的耗时运算,主线程往往将早于子线程结束之前结束,这时如果主线程想等待子线程执行完成之后再结束,例如,当子线程处理一个数据,主线程要取得这个数据中的值时,就要用到join()方法了。方法join()的作用是等待线程对象销毁。
jion()方法的使用 如上所说,如果子线程的执行时间大于主线程,则主线程结束时,子线程仍然在运行。
线程类:
1
2
3
4
5
6
7
8
9
10
11
12
13
14
15
16
17
18
19
20
21
package multiThread;public class MyThread1 extends Thread { volatile private String str = "string" ; @Override public void run () { try { sleep(10000 ); System.out.println("sub thread end!" ); } catch (InterruptedException e) { e.printStackTrace(); } } public void setStr (String str) { this .str = str; } }
运行类:
1
2
3
4
5
6
7
8
9
package multiThread;public class Main { public static void main (String[] args) throws InterruptedException { MyThread1 thread = new MyThread1 (); thread.start(); System.out.println("main thread end!" ); } }
结果:
1
2
main thread end! sub thread end!
可以看出,在子线程结束之前,主线程就已经结束了。
而此时在主线程加入join方法,就会使主线程等待子线程执行完毕后再结束。
改进运行类:
1
2
3
4
5
6
7
8
9
10
package multiThread;public class Main { public static void main (String[] args) throws InterruptedException { MyThread1 thread = new MyThread1 (); thread.start(); thread.join(); System.out.println("main thread end!" ); } }
结果:
1
2
sub thread end main thread end!
可以看出,主线程在等待子线程执行完毕过后才执行的。
join()方法与interrupt()方法 在使用join()方法的过程中,如果当前线程对象被中断,则当前线程出现异常。
join(long)方法的使用 x.join(long)方法中的参数用于设定等待的时间,不管x线程是否执行完毕,时间到了并且重新获得了锁,则当前线程会继续向后运行。如果没有重新获得锁,则一直在尝试,直到获得锁为止。
例如:
在线程中暂停3s,而join(2000)。
则结果为:
1
2
main thread end! sub thread end
相当于主线程暂停了2s。
那使用join(2000)和使用sleep(2000)有什么区别呢?上面的示例中在运行效果上并没有区别,其实区别主要来自于这两个方法在同步的处理上。
join()方法与sleep()方法的区别 join(long)方法的功能在内部是使用wait(long)方法来进行实现的,所以join(long)方法具有释放锁的特点。
join(long)方法源代码如下:
1
2
3
4
5
6
7
8
9
10
11
12
13
14
15
16
17
18
19
20
21
22
23
24
public final synchronized void join (long millis) throws InterruptedException { long base = System.currentTimeMillis(); long now = 0 ; if (millis < 0 ) { throw new IllegalArgumentException ("timeout value is negative" ); } if (millis == 0 ) { while (isAlive()) { wait(0 ); } } else { while (isAlive()) { long delay = millis - now; if (delay <= 0 ) { break ; } wait(delay); now = System.currentTimeMillis() - base; } } }
从源代码中可以了解到,当执行wait(long)方法后当前线程的锁被释放 ,那么其他线程就可以调用此线程中的同步方法了。
即执行join方法的线程,在执行join这段时间内,是不持有锁的。
而Thread.sleep(long)方法却不释放锁 。
另外需要注意一点,join()无参方法或join(time)有参方法一旦执行,说明源代码中的wait(time)已经被执行,也就证明锁被立即释放,仅仅在指定的join(time)时间后当前线程会继续向下运行。
类ThreadLocal ThreadLocal又叫做线程局部变量,全称thread local variable,它的使用场合主要是为了解决多线程中因为数据并发产生不一致的问题。ThreadLocal为每一个线程都提供了变量的副本,使得每一个线程在某一时间访问到的并不是同一个对象,这样就隔离了多个线程对数据的数据共享,这样的结果无非是耗费了内存,也大大减少了线程同步所带来的性能消耗,也减少了线程并发控制的复杂度。
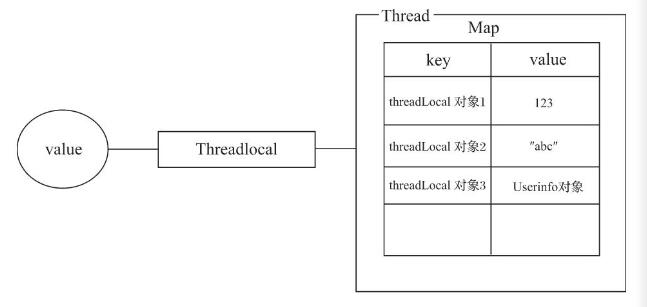
类ThreadLocal的原理 类ThreadLocal的主要作用是将数据放入当前线程对象中的Map中,这个Map是Thread类的实例变量。类ThreadLocal自己不管理、不存储任何数据,它只是数据和Map之间的桥梁,用于将数据放入Map中,执行流程如下:数据→ThreadLocal→currentThread()→Map。
执行后每个线程中的Map存有自己的数据,Map中的key存储的是ThreadLocal对象,value就是存储的值。每个Thread中的Map值只对当前线程可见,其他线程不可以访问当前线程对象中Map的值。当前线程销毁,Map随之销毁,Map中的数据如果没有被引用、没有被使用,则随时GC收回。
类ThreadLocal的使用 一般是在公共位置定义一个static的ThreadLocal对象,然后在线程中直接存取该变量即可。对于不同的线程,ThreadLocal内部进行处理,将其存储到map中。
如:
运行类:
1
2
3
4
5
6
7
8
9
10
11
12
13
14
15
package multiThread;public class Main { public static ThreadLocal<String> tag = new ThreadLocal <String>(); public static void main (String[] args) throws InterruptedException { MyThread1 thread = new MyThread1 (); MyThread1 thread2 = new MyThread1 (); thread.start(); thread2.start(); thread.setStr("thread" ); thread2.setStr("thread2" ); System.out.println("main thread end!" ); } }
线程类:
1
2
3
4
5
6
7
8
9
10
11
12
13
14
15
16
17
18
19
20
21
22
package multiThread;public class MyThread1 extends Thread { volatile private String str = "string" ; @Override public void run () { try { sleep(3000 ); System.out.println("sub thread end" ); } catch (InterruptedException e) { e.printStackTrace(); } } public void setStr (String str) { Main.tag.set(str); System.out.println(Main.tag.get()); } }
结果:
1
2
3
4
5
thread thread2 main thread end! sub thread end sub thread end
重写类ThreadLocal解决初始化问题 ThreadLocal如果没有放置值,则get默认返回null。要想自定义初值,可以继承ThreadLocal并重写initialValue。
如:
1
2
3
4
5
6
7
8
9
10
11
package multiThread;public class MyLocalThread <T> extends ThreadLocal <T>{ @SuppressWarnings("unchecked") @Override protected T initialValue () { return (T) "init value" ; } }
则此时,在未初始化之前get,返回的将是”init value”。
类InheritableThreadLocal的使用 使用类InheritableThreadLocal可使子线程继承父线程的值。
类ThreadLocal的问题 类ThreadLocal无法实现对线程的ThreadLocal值继承。
类InheritableThreadLocal 使用InheritableThreadLocal类可以让子线程从父线程继承值。
例如:
工具共享类:
1
2
3
4
5
6
package tools;public class Tools { public static InheritableThreadLocal tl = new InheritableThreadLocal (); }
线程类:
1
2
3
4
5
6
7
8
9
10
11
12
13
14
15
16
17
18
package extthread;import tools.Tools;public class ThreadA extends Thread { @Override public void run () { try { for (int i = 0 ; i < 10 ; i++) { System.out.println("在ThreadA线程中取值=" + Tools.tl.get()); Thread.sleep(100 ); } } catch (InterruptedException e) { e.printStackTrace(); } } }
运行类:
1
2
3
4
5
6
7
8
9
10
11
12
13
14
15
16
17
18
19
20
21
22
23
24
25
package test;import extthread.ThreadA;import tools.Tools;public class Test { public static void main (String[] args) { try { for (int i = 0 ; i < 10 ; i++) { if (Tools.tl.get() == null ) { Tools.tl.set("此值是main线程放入的!" ); } System.out.println(" 在Main线程中取值=" + Tools.tl.get()); Thread.sleep(100 ); } Thread.sleep(5000 ); ThreadA a = new ThreadA (); a.start(); } catch (InterruptedException e) { e.printStackTrace(); } } }
结果:
1
2
3
4
5
6
7
8
9
10
11
12
13
14
15
16
17
18
19
20
在Main线程中取值=此值是main线程放入的! 在Main线程中取值=此值是main线程放入的! 在Main线程中取值=此值是main线程放入的! 在Main线程中取值=此值是main线程放入的! 在Main线程中取值=此值是main线程放入的! 在Main线程中取值=此值是main线程放入的! 在Main线程中取值=此值是main线程放入的! 在Main线程中取值=此值是main线程放入的! 在Main线程中取值=此值是main线程放入的! 在Main线程中取值=此值是main线程放入的! 在ThreadA线程中取值=此值是main线程放入的! 在ThreadA线程中取值=此值是main线程放入的! 在ThreadA线程中取值=此值是main线程放入的! 在ThreadA线程中取值=此值是main线程放入的! 在ThreadA线程中取值=此值是main线程放入的! 在ThreadA线程中取值=此值是main线程放入的! 在ThreadA线程中取值=此值是main线程放入的! 在ThreadA线程中取值=此值是main线程放入的! 在ThreadA线程中取值=此值是main线程放入的! 在ThreadA线程中取值=此值是main线程放入的!
可以看出,子ThreadA线程获取的值是从父线程main继承的。
InheritableThreadLocal原理 InheritableThreadLocal原理还是使用一个map来存储数据,但具体实现时,并不再引用自身作为map的key。而是直接使用父线程作为key。所以在读取的时候,始终能够保持父子线程读取到同一个对象。
重写childValue()方法实现对继承的值加工 InheritableThreadLocal不光可以直接覆盖原来父线程的值,还可以获取到父线程的值后,进行特定格式的加工。其具体是重写childValue()方法。
如:
1
2
3
4
5
6
7
8
9
10
11
12
13
14
15
package ext;import java.util.Date;public class InheritableThreadLocalExt extends InheritableThreadLocal { @Override protected Object initialValue () { return new Date ().getTime(); } @Override protected Object childValue (Object parentValue) { return parentValue + " 我在子线程加的~!" ; } }
结果:
1
2
3
4
5
6
7
8
9
10
11
12
13
14
15
16
17
18
19
20
21
在Main线程中取值=1407987668302 在Main线程中取值=1407987668302 在Main线程中取值=1407987668302 在Main线程中取值=1407987668302 在Main线程中取值=1407987668302 在Main线程中取值=1407987668302 在Main线程中取值=1407987668302 在Main线程中取值=1407987668302 在Main线程中取值=1407987668302 在Main线程中取值=1407987668302 在ThreadA线程中取值=1407987668302我在子线程加的~! 在ThreadA线程中取值=1407987668302我在子线程加的~! 在ThreadA线程中取值=1407987668302我在子线程加的~! 在ThreadA线程中取值=1407987668302我在子线程加的~! 在Threada线程中取值=1407987668302我在子线程加的~! 在ThreadA线程中取值=1407987668302我在子线程加的~! 在ThreadA线程中取值=1407987668302我在子线程加的~! 在ThreadA线程中取值=1407987668302我在子线程加的~! 在ThreadA线程中取值=1407987668302我在子线程加的~! 在ThreadA线程中取值=1407987668302我在子线程加的~!


